Understanding the Transaction Lifecycle
Describing Transaction’s Journey From Client to Core Server (Blockchain)
Success
A transaction is an atomic change in the state of the blockchain. The simplest form transfers value from address A to B, incorporating a fee for the processing. Transactions are bundled into a block. At that moment they are committed to the blockchain and become irreversible.
All valid transactions are begin submitted as payload data via the Public REST API. This valid transactions end as immutable history on the blockchain (are included in blocks). While the implementation specifics will depend on the platform used to submit the transaction, ARK’s extensive SDK coverage ensures that developers experience a unified workflow across languages and platforms.
In the next sections we will look into the transaction lifecycle from creation to final inclusion in the blocks.
Transaction Journey From Client To Blockchain
1. Create and Sign Transaction Locally
Transactions are generated and signed locally with one of many available SDK libraries. Locally generated and signed transactions are sent as a POST request with transaction data to the Core Server node.
Warning
Core Server (node) will accept a valid transaction, signed with a valid signature from a private key. Make sure you invoke the SDK builder’s sign method on your transaction object using the sender’s private key.
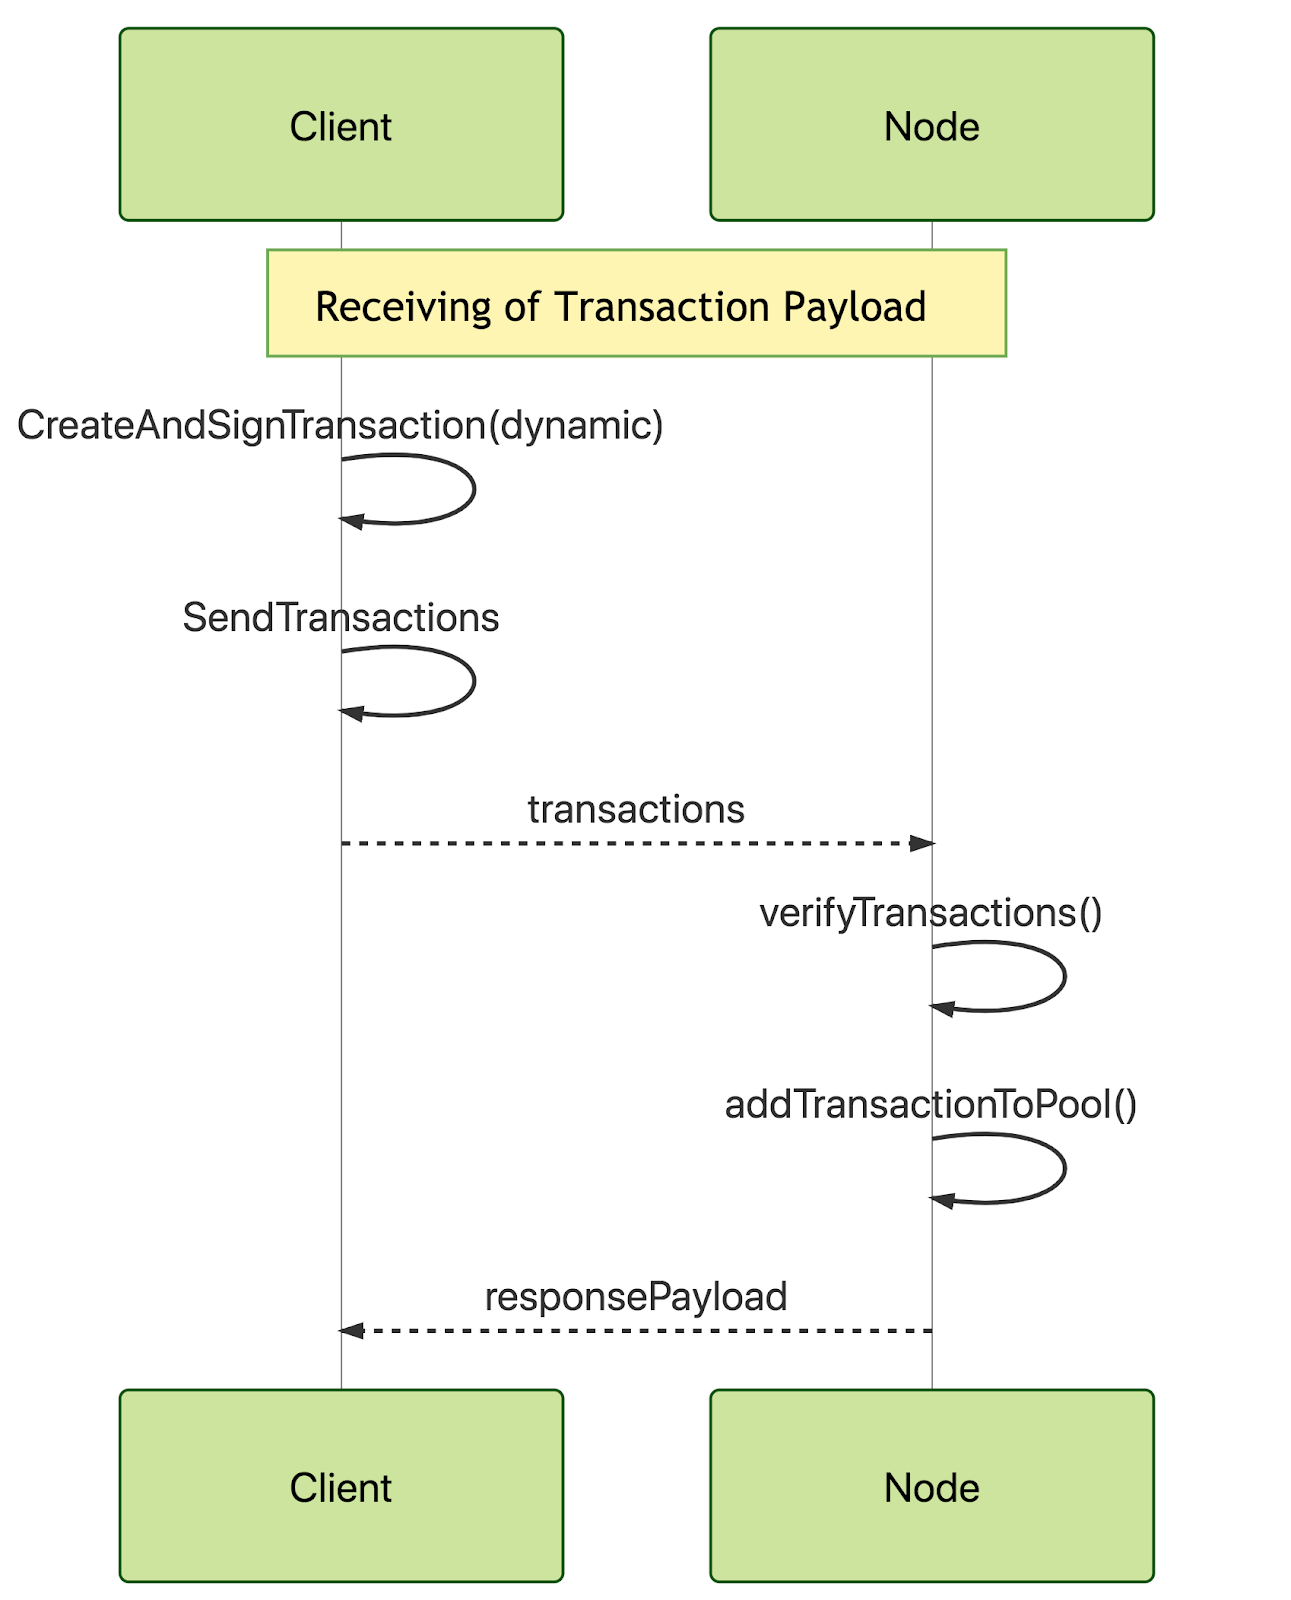
2. Receive and Validate Transaction on The Core Server
Transactions are received at the POST transactions endpoint of the Public API. From there all requests are first validated by the API endpoint schema. Each endpoint schema defines the structure that requests should conform to.
Transaction flow in short:
- Transaction Payload is received at the Core Server (Public API Endpoint)
- API Handler validates schema and sends transaction to the TransactionProcessor
- TransactionProcessor performs additional transaction payload checks in relation to the blockchain protocol. If all check are valid, transaction is added to the Transaction Pool
Success
All Client SDKs already create API requests to conform to this standard, so following the SDK guidelines will typically result in your transaction passing validation.
Notably, no blockchain-level validation occurs at this earliest stage in the transaction lifecycle. Request validation ensures that your POST request can be understood by the network, not that the data it contains represents a valid transaction. This task falls to the next class to handle transaction requests: the TransactionProcessor from the core-transaction-pool package.
Assuming validation is successful, the posted transactions are processed by the request handler, which passes the data to the TransactionProcessor for validation.
All transactions submitted to the TransactionProcessor are returned in one of four arrays:
- accept
- broadcast
- excess
- invalid
Internally, the TransactionProcessor processes transactions in its validate method by separating:
- transactions already in the pool
- transactions from blocked senders
- transactions from the future
- transactions with low fees for broadcast/pool inclusion
- transactions that fail to conform to their transaction type
Information
At this point, Core Server has a list of incoming transactions to add to the transaction pool. TransactionProcessor now checks the pool to see whether it is at capacity. If so, it compares the incoming transactions against the pooled transactions and removes the transactions with the lowest fees.
3. From TransactionPool To Transaction Inclusion Within Blocks
Transactions move out of the pool once a forging Delegate (a forger) is ready and eligible to forge it. At the moment of forging, transactions in the forger’s pool are grouped into a potential block and passed to the delegate’s forge method for inclusion in a block.
Inside the forge method, all transaction values, fees, and IDs within the block are added together. The values and fees are used to calculate block metadata, while the hashed IDs are concatenated and used as the block’s payloadHash property.

With this information in hand, the block data and sorted transactions are passed to the crypto library’s Block.create method alongside the forging delegate’s keys.
4. Block Creation
A block is a collection of transactions, but also it is the incremental unit of the blockchain. Every eight seconds, a Delegate Node (Forging Node) creates a new block by bundling a bunch of transactions, verifying each transaction, and signing the block.
Blocks hold quite a lot of metadata on the ARK blockchain, like:
- Height, an incremental ID.
- Timestamp.
- Transactions.
- Creator’s signature.
- Total transfer amount.
- Total fee amount.
The Block.create method uses the following algorithm to create a new block:
- Derive the delegate’s public key from the function’s
keysparameter. - Create a payload hash by serializing the block data into a binary-encoded format.
- Create a SHA256 hash by using the payload hash as input.
- Sign the SHA256 hash with the delegate’s private key.
- Create a block ID using the hashed block data.
- Cast the data into a Block model using the new transaction and block ID.
- Return the cast Block object.
Here, the cryptographic functions used by ARK to generate hashes are identical to those used by Bitcoin. These functions are battle-tested by years of use and analysis in Bitcoin. Resources to learn more about the block creation process can be found in Bitcoin educational materials as well as relevant ARK documentation on serialization.
5. Block Propagation
With the forged block successfully returned to the forger library, the only remaining responsibility is to let the network know about the new block - block propagation.
The forged block is relayed to peers through the P2P layer following blockchain protocol mechanics.