Exchanges API Guide
Information
For exchanges we recommend the usage of JSON-RPC server with optimized methods for client and crypto functionality.
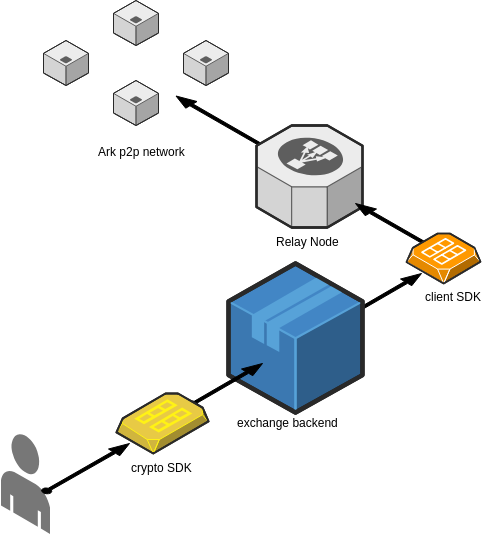
Best practice is to install a Relay Node and JSON-RPC in a secure environment. If really necessary then follow the basic instructions for connection via Public REST API.
Connecting to the PUBLIC API is done via the Crypto and Client SDKs. Many queries can be performed using the Client SDK alone, while the Crypto SDK performs any actions requiring cryptographic functionality (i.e., signing transactions).
At a surface level, the two SDKs are separated by their functions and intended use cases:
- The Crypto SDK provides the cryptographic functions necessary to authenticate and validate ARK transactions.
- The Client SDK provides wrapper functions to unify and streamline API calls between your application and the ARK blockchain.
Put another way, the Crypto SDK structures your data in a format that all ARK nodes can understand, while the Client SDK handles the actual communication between your application and an ARK node. Where the Crypto SDK is internal, the Client SDK is external, as the below diagram illustrates:
 clientCrypto
Note that the Public API is only available after a node has fully synced. This ensures your data on the blockchain is up to date.
Setup
These quick actions will all assume you’ve loaded a Client instance with the IP address of your node and the API version you’re requesting.
ARK Node (v1) has been deprecated. Some references to V1 client constructors may remain for legacy purposes. However, no current clients require you to specify the API Version (defaults to v2).
1const Client = require("@arkecosystem/client");2const exchangeClient = new Client("YOUR.NODE.IP", 2);1HashMap<String, Object> map = new HashMap<>();2map.put("host", "http://node-ip:port/api/");3map.put("API-Version", 2);4 5Connection<Two> connection = new Connection(map); 1package main 2 3import ( 4 ark "github.com/ArkEcosystem/go-client/client" 5 "net/url" 6 ) 7 8func main() { 9 client := ark.NewClient(nil)10 client.BaseURL, _ = url.Parse("http://{NODE_IP}:{NODE_HOST}/api")1from client import ArkClient2client = ArkClient('http://127.0.0.1:4003/api')Check Wallet Balance
Checking a wallet balance involves using the wallets resource to GET the wallet corresponding to a given ARK address.
1const walletAddress = "ARyNwFj7nQUCip5gYt4gSWG6F8evL93eBL"; 2let wallet; 3 4exchangeClient 5 .resource("wallets") 6 .get(walletAddress) 7 .then(response => { 8 wallet = response.data.data; 9 })10 .catch(error => {11 console.log(error);12 });13 14console.log(wallet.balance); 1... 2import "github.com/davecgh/go-spew/spew" 3 4func main() { 5 ... 6 responseStruct, _, err := client.Wallets.Get(context.TODO(), "ARyNwFj7nQUCip5gYt4gSWG6F8evL93eBL") 7 if err != nil { 8 log.Panic(err) 9 }10 spew.Dump(responseStruct)11}1from pprint import pprint2 3pprint(client.wallets.get(wallet_id='ARyNwFj7nQUCip5gYt4gSWG6F8evL93eBL'))Find Block Information
If you know the ID of the block you are looking for, you can use the GET method on the blocks resource to return information on that block.
1const blockId = 4439278960598580069; 2let block; 3 4exchangeClient 5 .resource("blocks") 6 .get(blockId) 7 .then(response => { 8 block = response.data.data; 9 })10 .catch(error => {11 console.log(error);12 });13 14console.log(block);1func main() {2 ...3 responseStruct, _, err := client.Blocks.Get(context.TODO(), 4439278960598580069)4 if err != nil {5 log.Panic(err)6 }7 spew.Dump(responseStruct)8}1pprint(client.blocks.get(block_id='4439278960598580069'))Alternatively, if you are not sure of the block ID, or if you want to find all wallets in a range, you can make use of the wallets.search method. This endpoint accepts a JSON object representing the search parameters to use when narrowing down a list of blocks.
The following block properties can be used to create your range:
- timestamp
- height
- numberOfTransactions
- totalAmount
- totalFee
- reward
- payloadLength
To use any of these properties as a range, include the relevant key in your request as an object containing from and to specifiers.
For example, this code can be used to search all blocks between blockchain heights 720 and 735 with total fees between 0 and 2000 arktoshi:
1exchangeClient 2 .resource("blocks") 3 .search({ 4 height: { 5 from: 720, 6 to: 735 7 }, 8 totalFee: { 9 from: 0,10 to: 200011 }12 })13 .then(response => {14 console.log(response.data); // all blocks matching the search criteria15 }); 1func main() { 2 ... 3 responseStruct, _, err := client.Blocks.Search(context.TODO(), ark.BlocksSearchRequest{ 4 Height: ark.FromTo{From: 720, To: 735}, 5 TotalFee: ark.FromTo{From: 0, To: 2000}, 6 }) 7 if err != nil { 8 log.Panic(err) 9 }10 spew.Dump(responseStruct)11}1pprint(client.blocks.search({2 "height": {"from": 720, "to": 735},3 "totalFee": {"from": 0, "to": 2000},4 }))Create and Broadcast Transactions
To create transactions, make use of the transactionBuilder module of @arkecosystem/crypto. First, install the package from npm or your language’s equivalent:
1yarn add @arkecosystem/crypto1go get -u github.com/arkecosystem/go-crypto/crypto1pip install arkecosystem-cryptoThe crypto package functionality we’ll use here is the transactionBuilder, which provides a series of “chainable” methods that can be called, one after another, to produce a transaction object. These methods create and define your transaction: its type, its amount in arktoshi, its signature, and more.
Regardless of which SDK you use, every transactionBuilder contains a similar function to getStruct, which will return a completed transaction object.
After making one or more of these transaction objects, you can combine them into an array to use as the transactions key in your request.
With all the steps together, here is an example of how to send a transaction for approval:
1const crypto = require("@arkecosystem/crypto"); 2const transactionBuilder = crypto.transactionBuilder; 3 4const transaction = transactionBuilder 5 .transfer() 6 .amount(2 * Math.pow(10, 8)) 7 .recipientId(recipientId) 8 .sign(passphrase) 9 .getStruct();10 11exchangeClient12 .resource("transactions")13 .create({14 transactions: [transaction]15 })16 .then(response => {17 console.log(response.data);18 19 if (response.data.errors) {20 errors.forEach(error => {21 console.log(error);22 });23 }24 })25 .catch(error => {26 console.log(error);27 }); 1... 2import ark_crypto "github.com/arkecosystem/go-crypto/crypto" 3 4func main() { 5 ... 6 transaction := ark_crypto.BuildTransfer( 7 recipientId, 8 uint64(amount), 9 "Hello World",10 passphrase,11 )12 13 // cast is a fictitious helper function which alters ark_crypto.Transaction14 // into an ark_client.CreateTransactionRequest.15 responseStruct, _, err := client.Transaction.Create(context.TODO(), cast(transaction))16 if err != nil {17 log.Panic(err)18 }19 spew.Dump(responseStruct)20}1...2 3from crypto.transactions.builder.transfer import Transfer4 5tx = Transfer(recipientId=recipientId, amount=1000)6tx.sign(passphrase)7pprint(client.transactions.create([tx]))There are a few things worth noticing about the above code. Firstly, the code assumes that you have declared two variables already:
passphrase- the passphrase of the sending account, used to sign the transaction. This should come from somewhere secure, such as a.envfile.recipientId- the ARK address of the receiving account. Should be provided by the exchange user when submitting withdrawal requests.
Second, when sending your request using the exchangeClient, ensure that the value of transactions is an array, even if you have only one transaction object.
If your request is successful, you will receive a response with the following data key:
1{2 data: {3 accept: [ '96e3952b66a370d8145055b55cedc6f1435b3a71cb17334aa954f8844ad1202f' ],4 broadcast: [ '96e3952b66a370d8145055b55cedc6f1435b3a71cb17334aa954f8844ad1202f' ],5 excess: [],6 invalid: []7 },8 errors: null9}Let us look at the returned data object in more depth. It is composed of four arrays, each holding zero or more transaction IDs:
accept- a list of all accepted transactionsbroadcast- a list of all transactions broadcast to the networkexcess- if the node’s transaction pool is full, this lists all excess transactionsinvalid- a list of all transactions deemed invalid by the node
Our sample code above submitted one transaction, which the node accepted and broadcast and thus the accept and broadcast arrays contain precisely one item each: the ID of the transaction we submitted.
If we had submitted any invalid transactions, the invalid list would have contained their IDs, and the errors key would have been populated with one error per invalid transaction.
The diagram below offers a top-level overview of the transaction submission process:
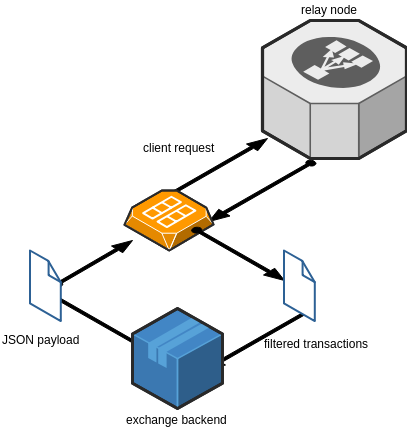 Transaction Flow
Check Transaction Confirmations
Once a transaction has been created and added to the blockchain, you can access the number of confirmations it has by using the transactions resource to get the value matching the transaction ID.
1const transactionId =2 "9085b309dd0c20c12c1a00c40e1c71cdadaa74476b669e9f8a632db337fb6915";3 4exchangeClient5 .resource("transactions")6 .get(transactionId)7 .then(response => {8 console.log(response.data);9 }); 1... 2 3func main() { 4 ... 5 txID := "9085b309dd0c20c12c1a00c40e1c71cdadaa74476b669e9f8a632db337fb6915" 6 responseStruct, _, err := client.Transactions.Get(context.TODO(), txID) 7 if err != nil { 8 log.Panic(err) 9 }10 spew.Dump(responseStruct)11}1txID = "9085b309dd0c20c12c1a00c40e1c71cdadaa74476b669e9f8a632db337fb6915"2pprint(client.transactions.get(transaction_id=txID))If the transaction has been added to the blockchain, you’ll receive the following data structure in your console:
1{ 2 data: { 3 id: 'a4d3d3ab059b8445894805c1158f06049a4200b2878892e18d95b88fc57d0ae5', 4 blockId: '7236620515792246272', 5 version: 1, 6 type: 0, 7 amount: 200000000, 8 fee: 10000000, 9 sender: 'ANBkoGqWeTSiaEVgVzSKZd3jS7UWzv9PSo',10 recipient: 'AbfQq8iRSf9TFQRzQWo33dHYU7HFMS17Zd',11 signature: '304402206f1a45d0e8fadf033bfd539ddf05aa33ca296813f30a72a0e17d560e2d04ba8e02204a2525972d14bb3da407a04f2b9d797747a4eb99ff547e4803f60143f6a68543',12 confirmations: 0,13 timestamp: {14 epoch: 54759242,15 unix: 1544860442,16 human: '2018-12-15T07:54:02.000Z'17 }18 }19}You can see that the confirmations key holds the number of confirmations this transaction has received from the network, in the above case 0. As the average block takes 8 seconds to forge, finality is typically established within a minute following a transaction’s addition to the blockchain.
Check Node Status
Checking node status can be done by using the node resource’s status method:
1exchangeClient2 .resource("node")3 .status()4 .then(response => {5 console.log(response.data);6 }); 1... 2 3func main() { 4 ... 5 responseStruct, _, err := client.Node.Status(context.TODO()) 6 if err != nil { 7 log.Panic(err) 8 } 9 spew.Dump(responseStruct)10}1pprint(client.node.status())By running this code, you’d see the output in your console resembling the following object:
1{2 data: {3 synced: true, // whether this node is fully synchronized with the network4 now: 14468, // the current network height of this node's blockchain5 blocksCount: 0 // if not synced, the number of blocks yet to be synced6 }7}If synced is true, your node is operating as expected and fully synced with the ARK network. Otherwise, use the blocksCount key to get an estimation of how long your node will take to sync.